A practical multicamera walkthrough of Chapter7 in the completed 20250315 project
Follow a real outdoor ceremony with three synchronized camera tracks. Compare the main and reverse angles, understand track priority, review the available controls, and generate an editable chapter timeline. Each image is an authentic application capture. This is a guided screenshot tutorial; the generated timeline and its later playback require their own checks.
3 camera tracksEntrance, main ceremony, and exit reviewed
Original priorities retainedOptional control exercises were restored
16 captured stepsFive output files generated
01 / PREPARE
Start with the right project
Open the existing 20250315 record identified by Last Modified: 2026-09-17 15:05. Several records share the same project name; the name alone does not identify this session.
Confirm that preprocessing has finished and that the chapter list is populated. The demonstration uses the completed record with 276 / 276 in both phases.
Choose Chapter7 — Ceremony. The list shows 04:41:02–05:26:35 and 6 clips. Verify the pictures as well as the label: this session shows the couple during the main outdoor ceremony.
Keep the original media and generated supporting files available. Exported timelines refer to source media; XML does not embed the video and audio.
Review different parts of the ceremony before changing priorities. A camera that points at the ground at one instant may provide useful footage elsewhere. Apply a control only over the intended range.
For the shortest workflow, open the chapter, compare and review the footage, confirm the desired priorities, and process. The Reverse Tracks and Exclude/Include sequences below are optional control demonstrations; both were restored before submission.
Use this walkthrough with a completed project. The optional Reverse Tracks and Exclude/Include exercises are restored before processing; the original event-based priorities and track weights are retained. Keyboard and additional editing controls are supplied as reference guidance and were not exercised here.
02 / FOLLOW ALONG
From camera comparison to processing
Move through the screenshots at your own pace. Use Show all steps for the complete reference. Every image opens at a larger size.
All steps are available below. Enable JavaScript for guided navigation and image enlargement, or open an image directly.
Step 01 of 16
01
In the application
Open the completed project
Start from the prepared project record used for this ceremony demonstration.
EnlargeThe older completed 20250315 record is identified by its modification time.
Do this
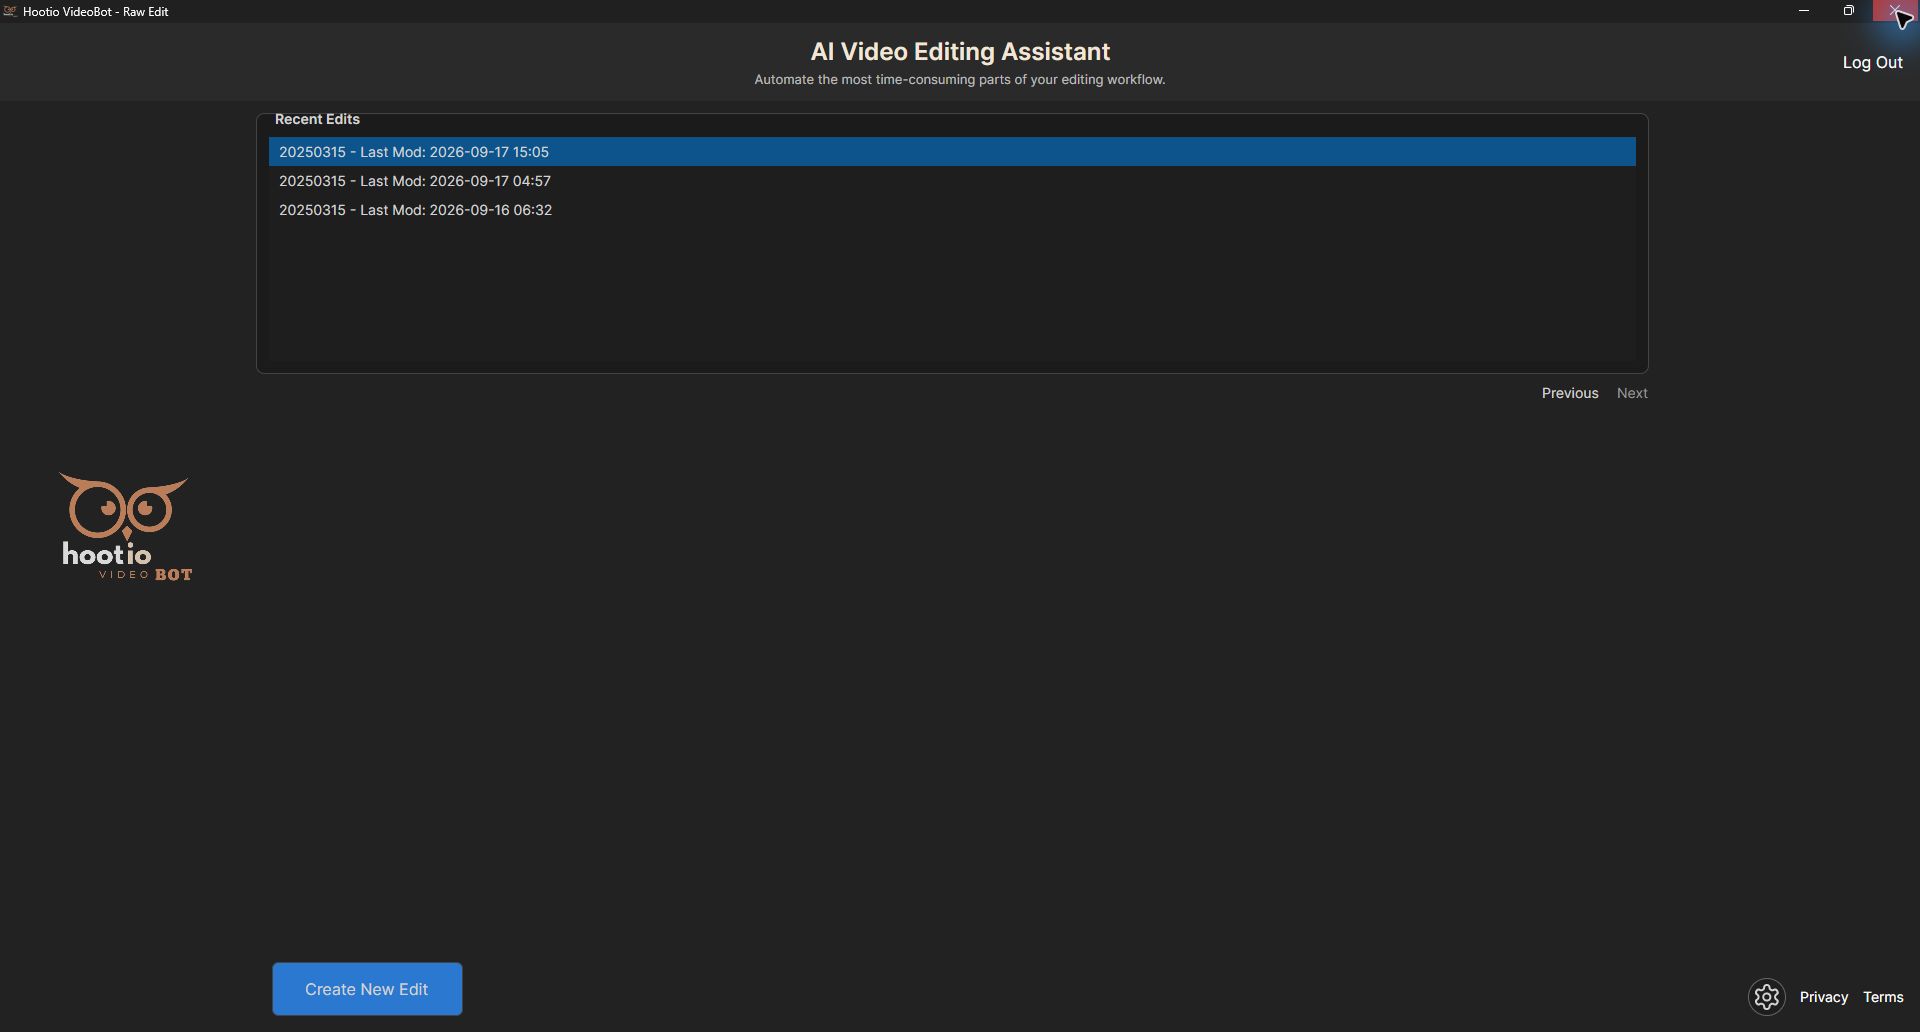
In Recent Edits, locate 20250315 — Last Mod: 2026-09-17 15:05.
Open that record and allow its saved project data to load.
Confirm the completed preprocessing status and populated chapter list before opening a chapter.
Check the result
The chosen record is Last Modified: 2026-09-17 15:05.
Both preprocessing phases were confirmed complete at 276 / 276. This home-screen capture identifies the record; the completion counts are a session observation.
Keep in mind
Use the modification time to distinguish records with the same name.
02
In the application
Open the main Ceremony chapter
Enter Smart Edit for Chapter7, whose pictures show the main outdoor ceremony.
EnlargeThe gateway identifies Chapter7 and provides the Smart Edit entry point.
Do this
Find Chapter7 — Ceremony in the chapter list. Check the displayed range 04:41:02–05:26:35 and the 6-clip count.
Double-click Chapter7 to open the gateway and confirm the project modification time.
Click Smart Edit, then wait for the editor to load.
Check the result
The gateway shows Export, Smart Edit, Smart Scene, and Cancel.
Smart Edit is the automatic multicamera workflow. Gateway Export is a separate route for the synchronized sequence.
Keep in mind
Confirm the footage inside the editor; a chapter label alone does not establish the content.
03
In the application
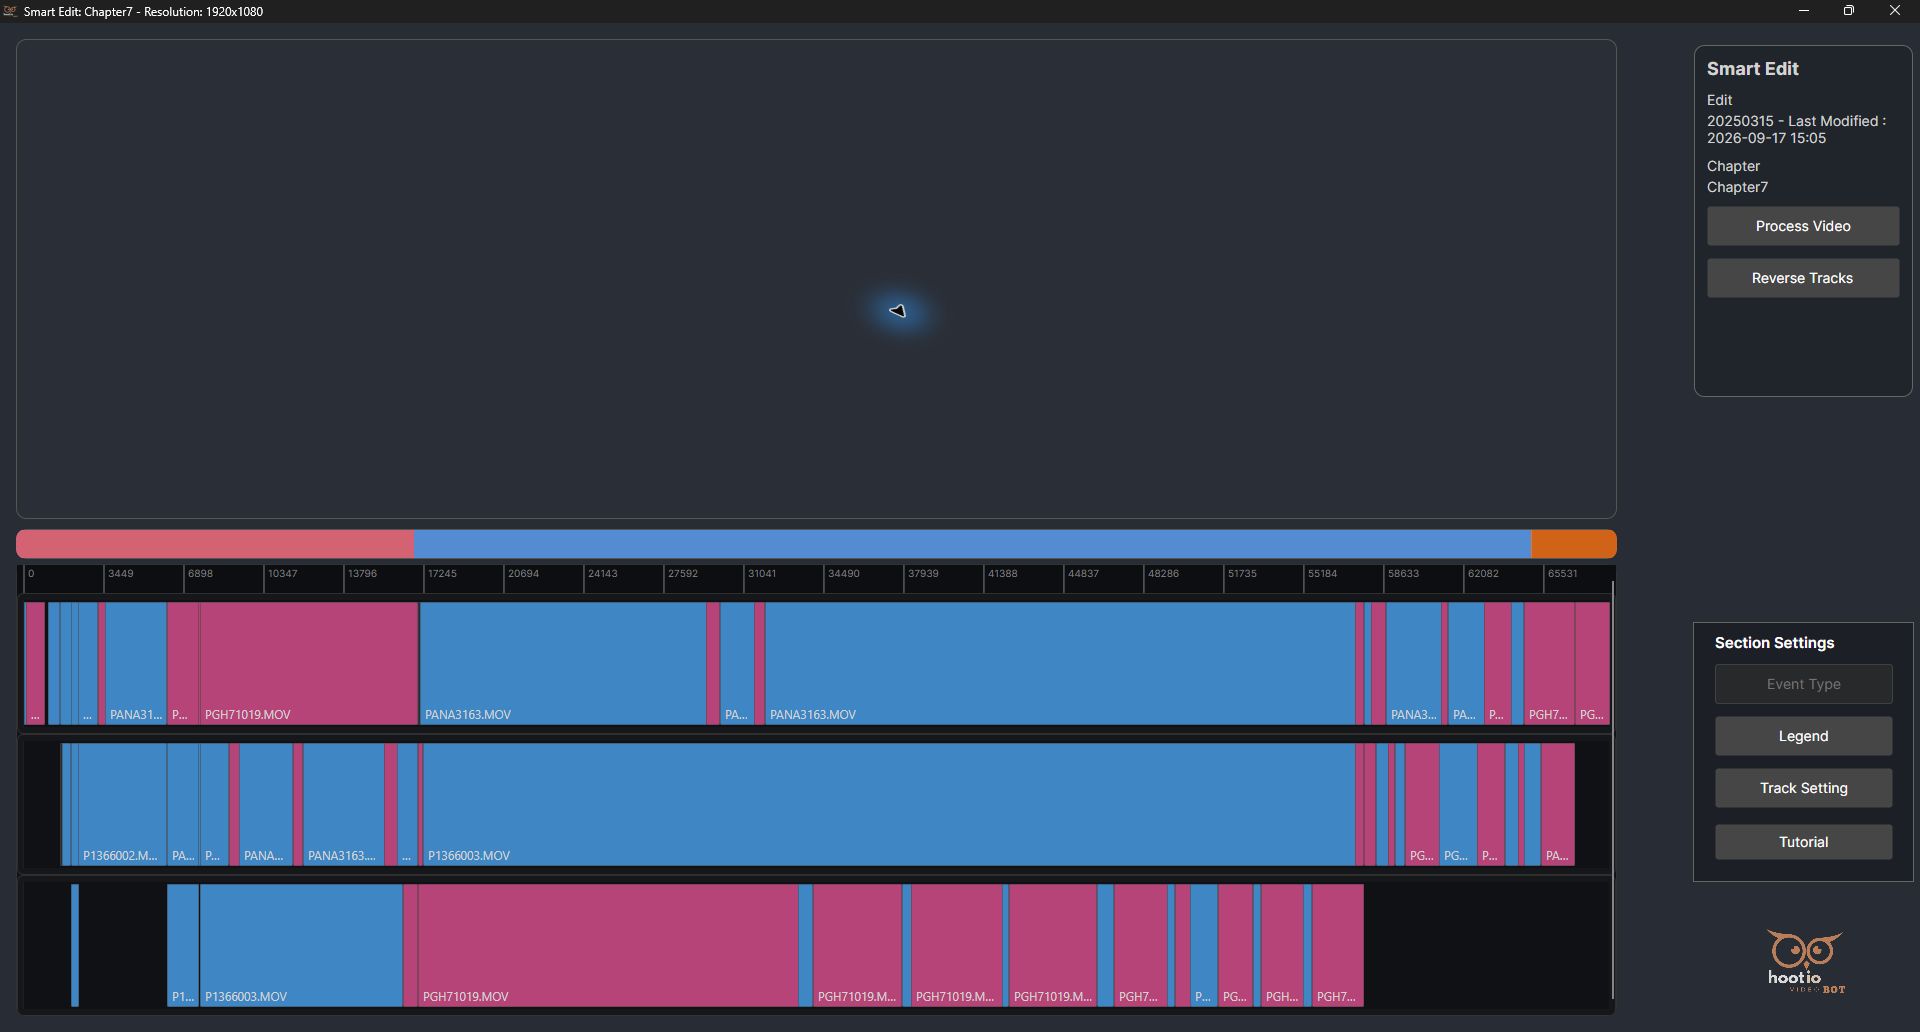
Read the three-track ceremony workspace
Locate the preview area, event sections, ruler, and track priorities before editing.
EnlargeChapter7 opens with three video tracks and pre-arranged event sections.
Do this
Maximize the Smart Edit window and confirm Chapter7 and resolution 1920 × 1080 in the title.
Locate the preview area, colored event strip, frame ruler, and three stacked video rows.
Notice that the event strip is already divided into entrance, ceremony, and exit sections; inspect the existing arrangement before changing it.
Check the result
The top row is the preferred main track, the second is the supporting track, and the third supplies an additional alternative.
The ruler displays frame values, not seconds or HH:MM:SS timecode. The positions used here are approximate ruler locations.
The preview area is initially empty until a position is chosen. Numerous timeline blocks can represent portions of the chapter’s six listed source clips.
Keep in mind
A row can contain different source cameras in different event sections. Track priority and a physical camera name are not interchangeable.
04
In the application
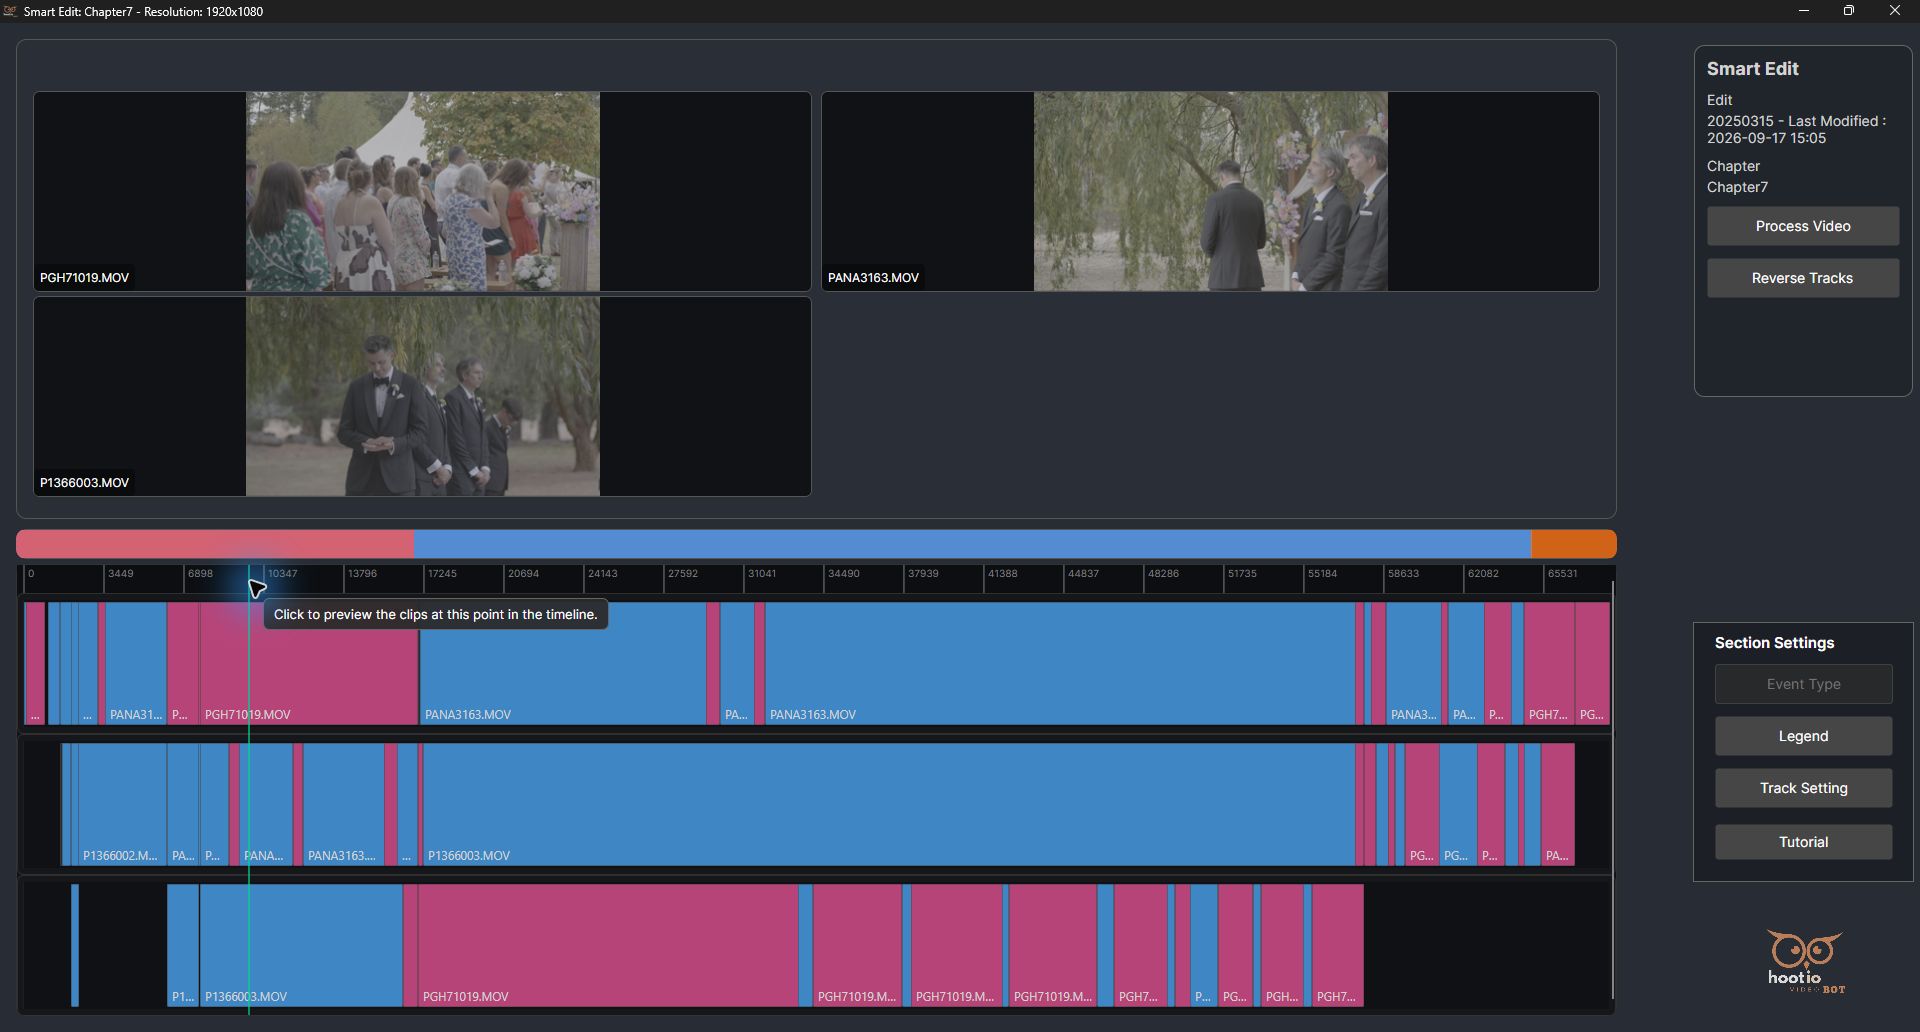
Compare all three ceremony angles
Identify the useful main and reverse angles at the same synchronized moment.
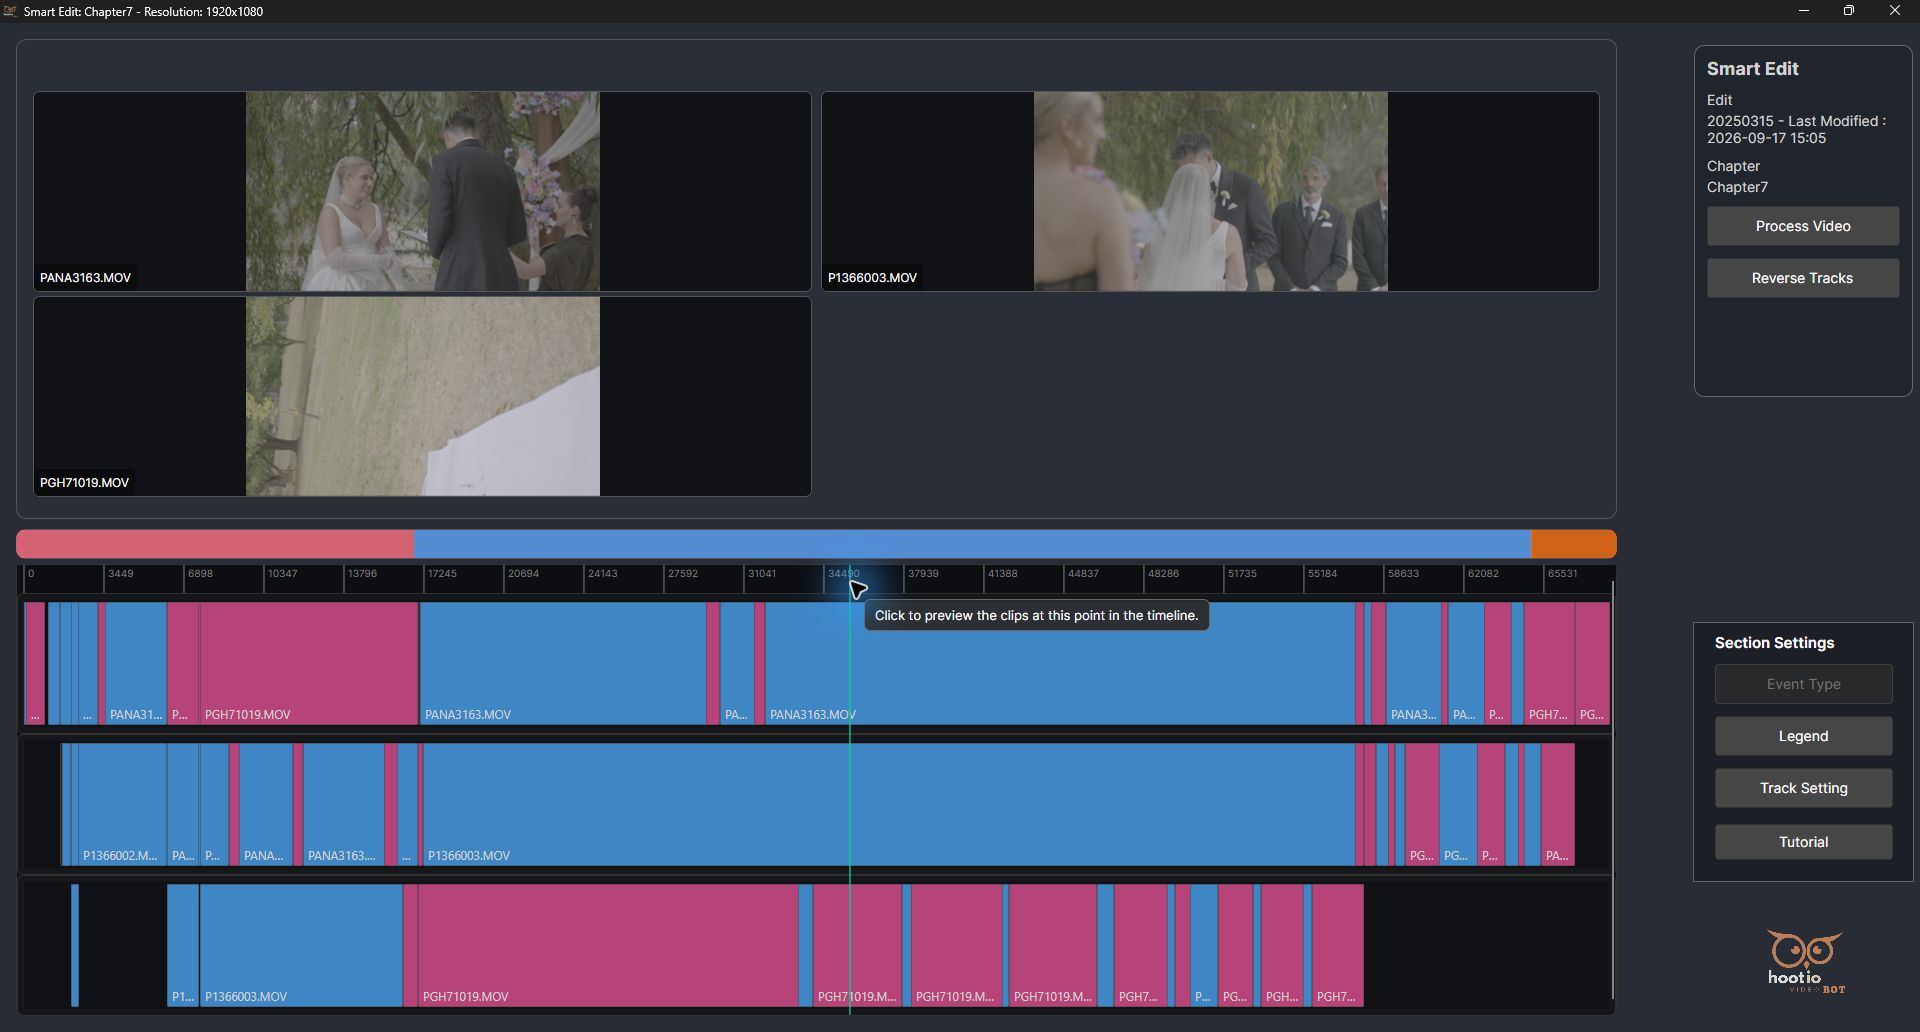
EnlargeThe main and reverse views both cover the couple; the third camera points at the ground at this selected moment.
Do this
Click the ruler near frame 35000 during the main ceremony.
Wait for the three previews and filenames to appear.
Compare PANA3163.MOV, P1366003.MOV, and PGH71019.MOV before deciding whether a change is needed.
Check the result
Track 1 / top-left preview: PANA3163.MOV shows the bride from the front and the groom from behind. It is a useful primary angle.
Track 2 / top-right preview: P1366003.MOV shows the groom from the front and the bride from behind. It is a useful reverse angle.
Track 3 / lower-left preview: PGH71019.MOV points toward the ground at this instant.
The existing first and second priorities are suitable at this position, so there is no reason to promote the ground-facing view.
Keep in mind
A single bad frame is not a reason to exclude an entire long recording. Inspect the duration and intended range before using Exclude or Hold.
05
Optional exercise; restored before processing
Optional: reverse the complete track order
See why the preferred row matters, then restore the original order in the next step.
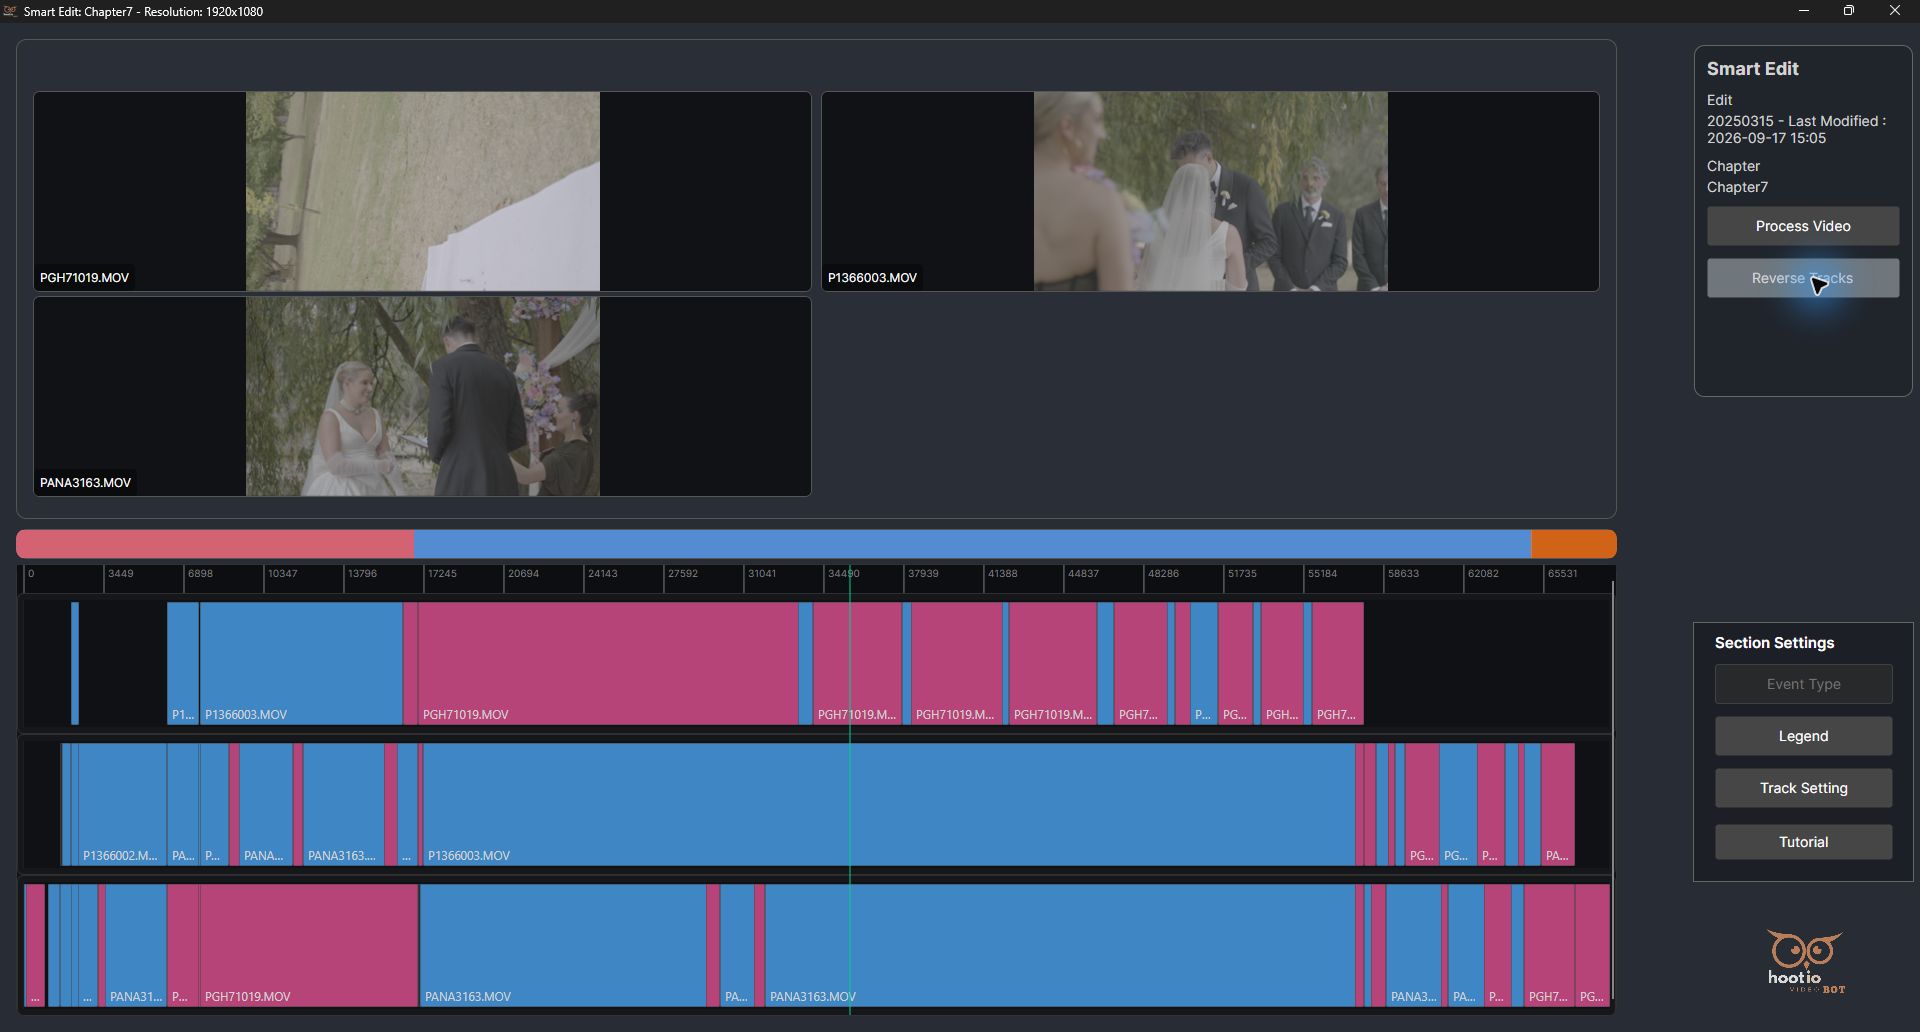
EnlargeTemporary reversal: PGH71019.MOV moves to the top row and top-left preview, putting the ground-facing view first.
Do this
Keep the ruler at the same ceremony moment near frame 35000.
Click Reverse Tracks once.
Compare the three preview positions and the complete row order.
Check the result
The third row becomes the first, and the first becomes the third. With three tracks, the middle row remains in the middle.
PGH71019.MOV is now preferred at this moment, while the useful PANA3163.MOV view moves to the lowest row.
This intentionally illustrates an unsuitable priority choice. It is restored immediately afterward.
Keep in mind
Reverse Tracks affects the entire track order, including other event sections. It is not a command to change one local clip.
06
Restore the training change
Restore the useful main-camera priority
Return the chapter to the arrangement selected for processing.
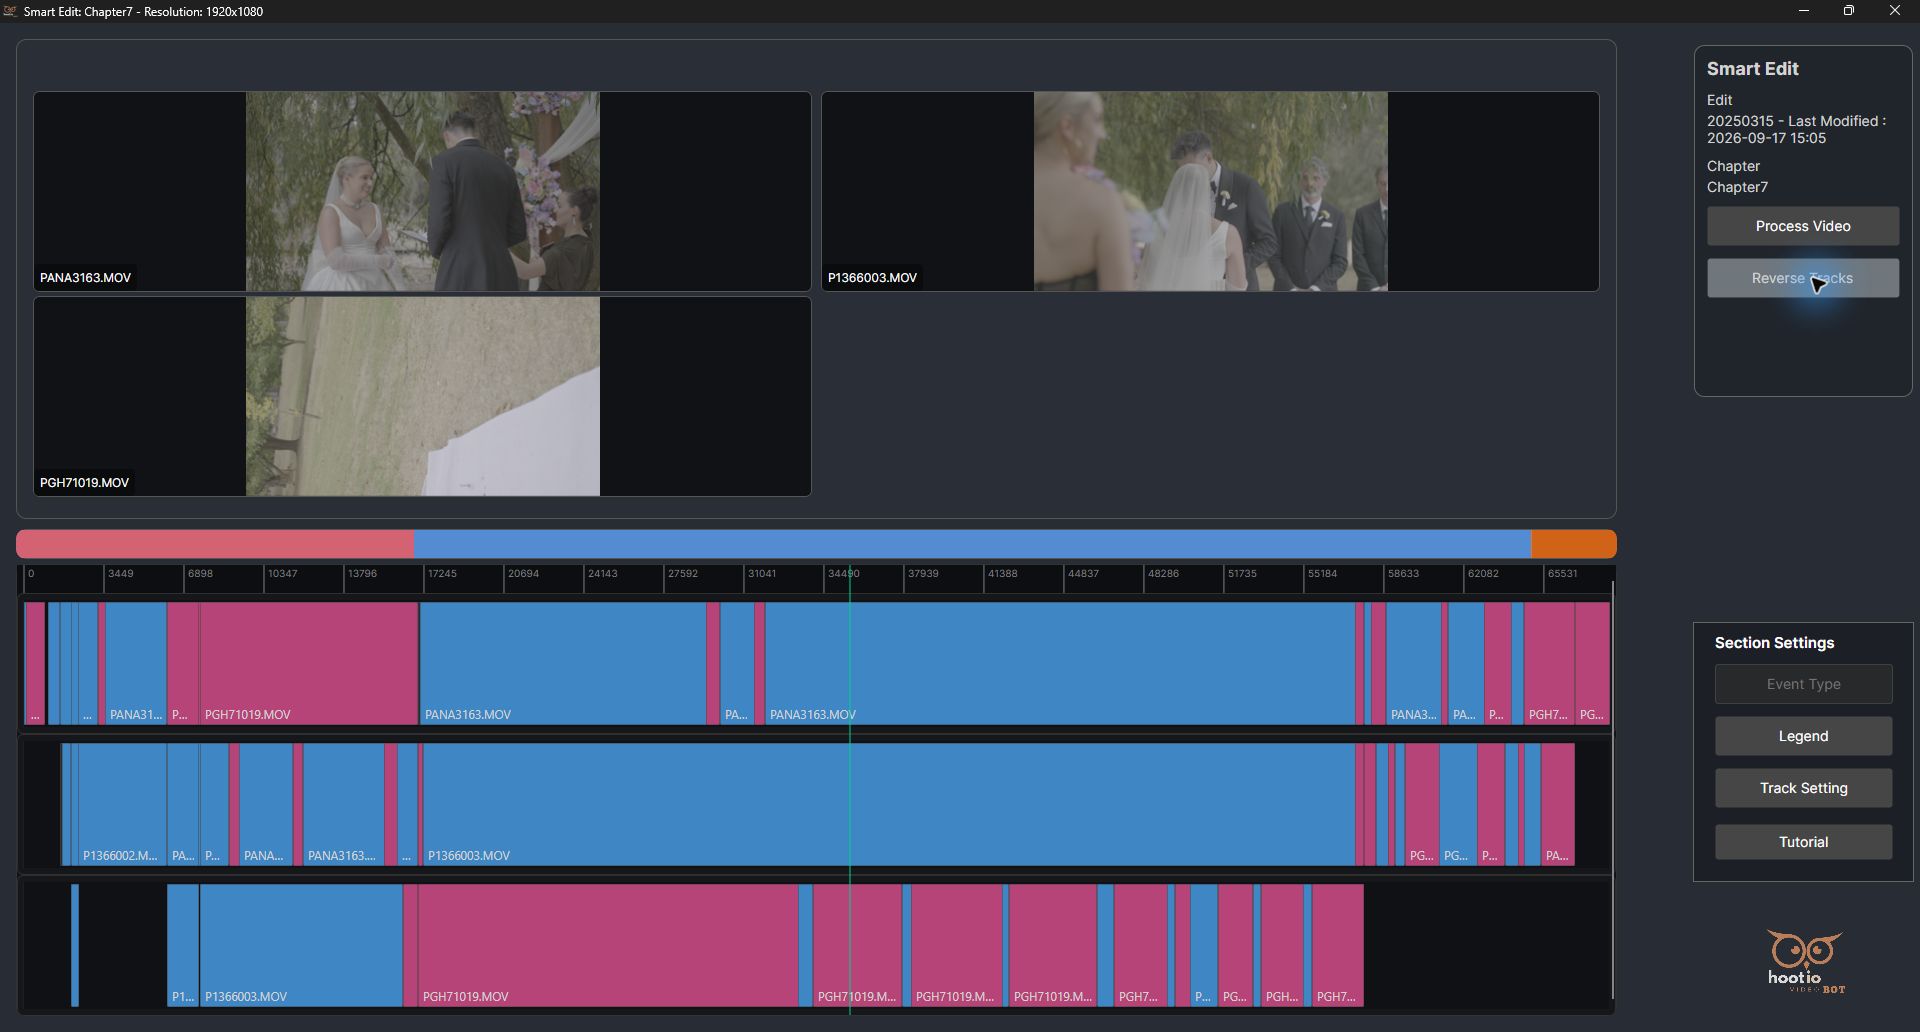
EnlargeThe original useful main and reverse angles are restored before continuing.
Do this
Click Reverse Tracks a second time.
At the same ruler position, check that PANA3163.MOV is back in the top row and top-left preview.
Confirm P1366003.MOV remains second and PGH71019.MOV is back on the third row.
Check the result
The second reversal restores the original order in this three-track session.
The final priority at this ceremony moment is PANA3163.MOV first, P1366003.MOV second, and PGH71019.MOV third.
Keep in mind
A second Reverse Tracks click restores this reversal; it is not a general Undo command for other edits.
07
Optional exercise; restored before processing
Optional: inspect Exclude on one section
Learn how to remove a specific timeline section from automatic selection without deleting media.
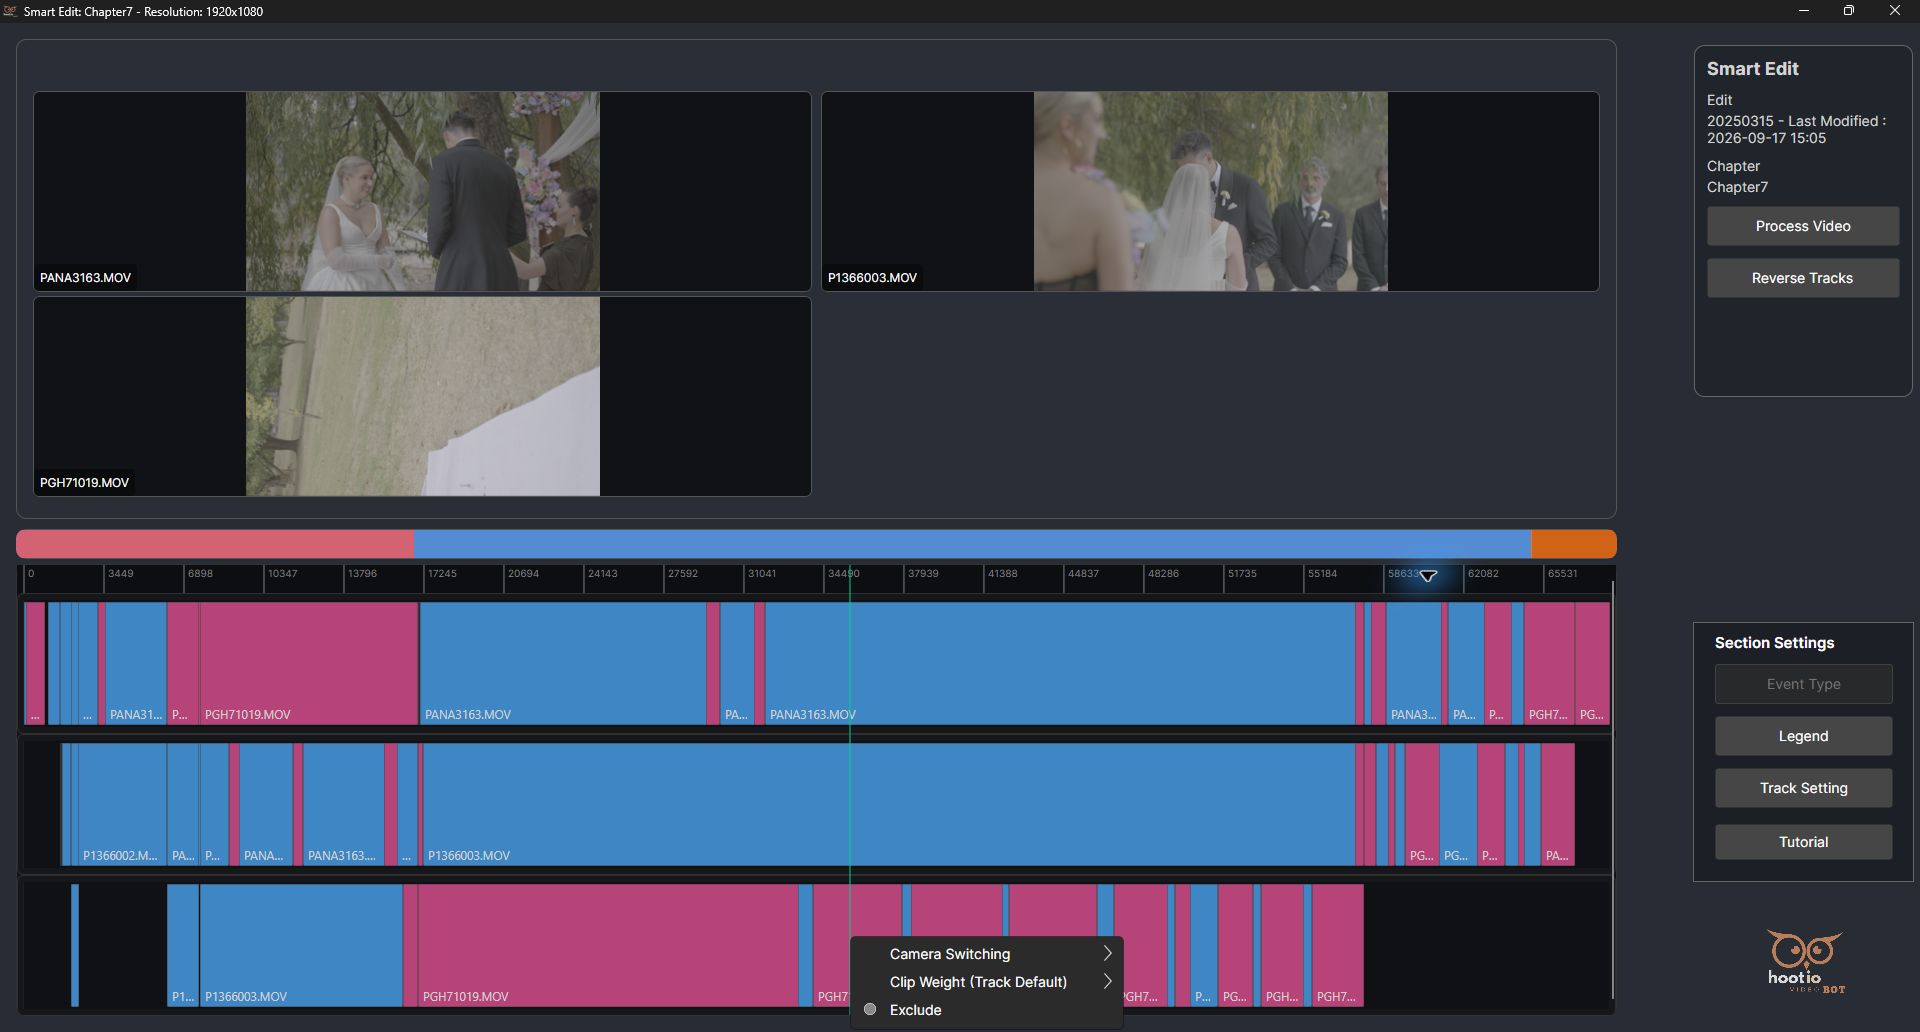
EnlargeThe clip context menu provides Camera Switching, Clip Weight (Track Default), and Exclude.
Do this
Right-click the PGH71019.MOV section in the third row beneath the current ceremony position.
Locate Exclude in the context menu.
Confirm that the context menu belongs to the intended section before choosing Exclude.
Check the result
The targeted section is part of the camera that currently points at the ground.
The exercise applies to the selected timeline section, not to deletion of the original MOV file.
Keep in mind
This is an optional training example. The section is included again before processing, as shown in the following steps.
08
Optional exercise; restored before processing
Recognize the excluded-section marker
Check the visible effect of Exclude before deciding whether to retain it.
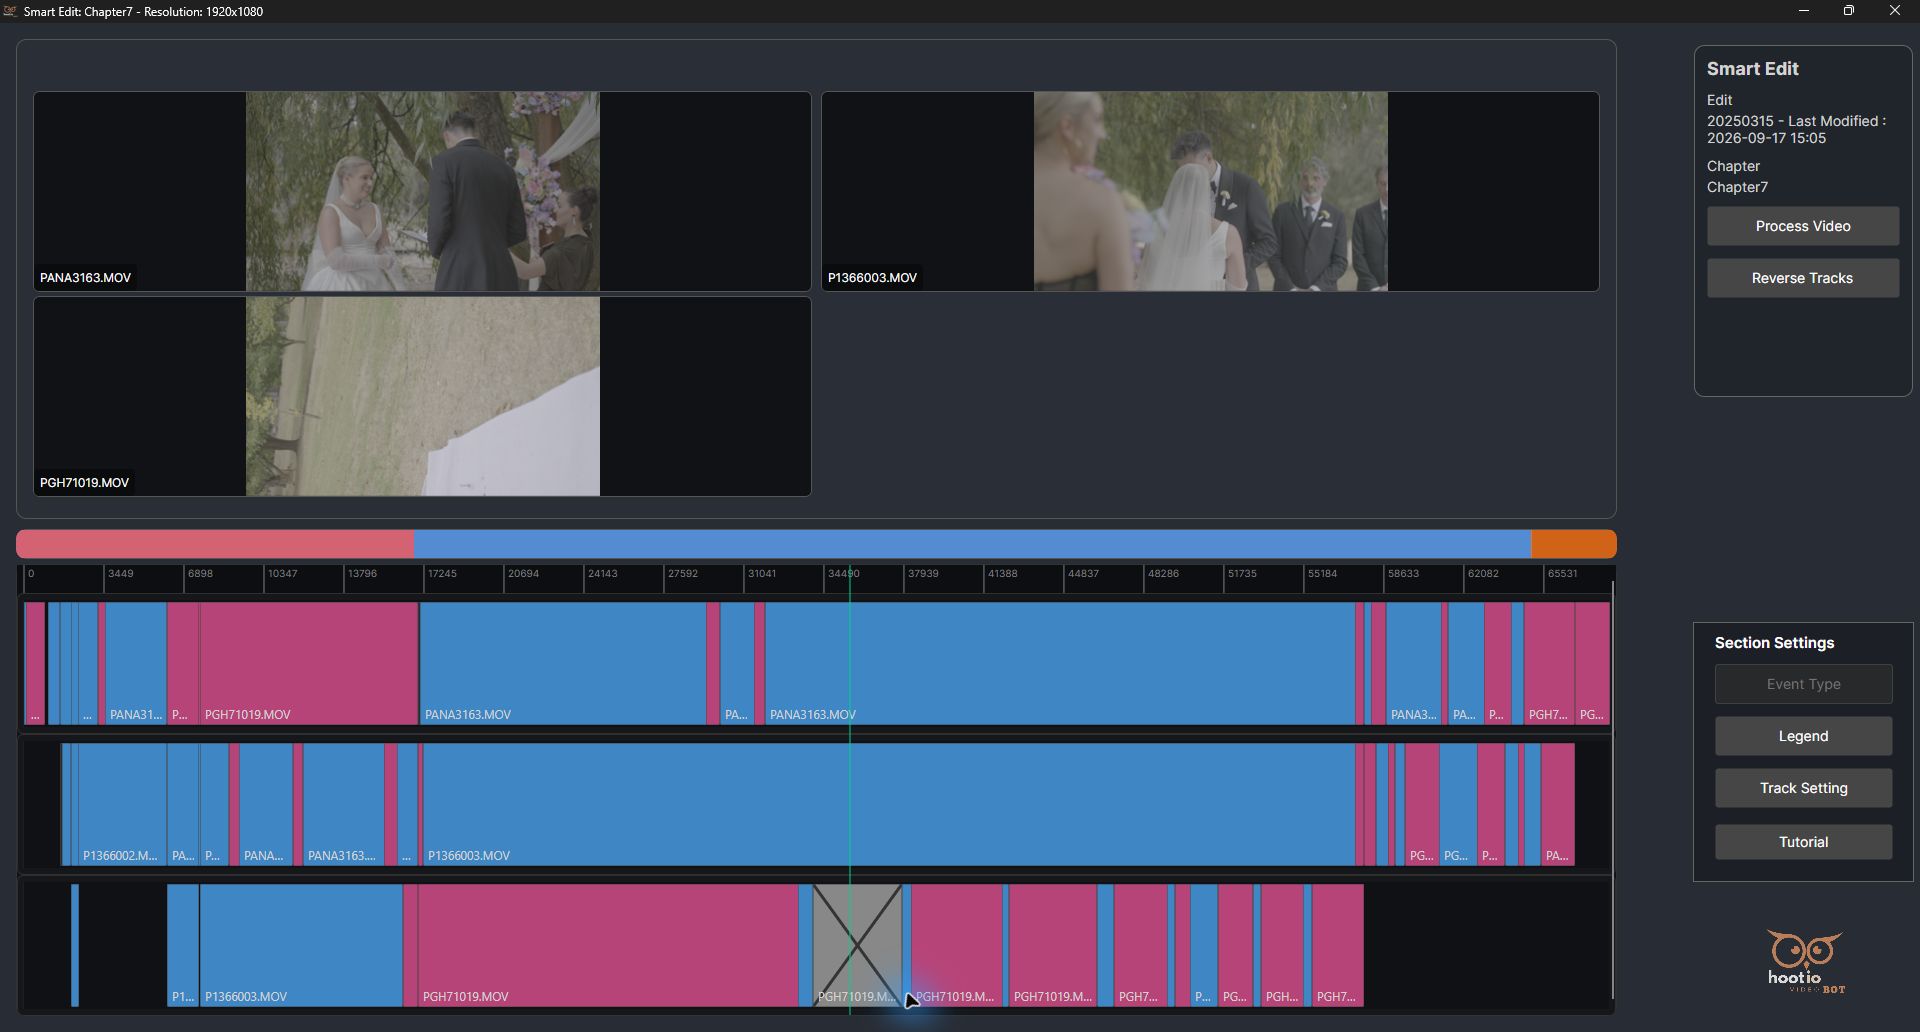
EnlargeThe targeted section is gray with an X, indicating that it is excluded from processing.
Do this
Choose Exclude and let the menu close.
Find the gray section with a large X on the third row.
Compare the marked section with the surrounding unchanged sections.
Check the result
The surrounding timeline sections remain visible.
The current preview can still show the camera image; the gray X is the participation indicator to check.
Keep in mind
Excluded segments are removed from the processing model on submission. Restore an exploratory exclusion before submitting if it should not affect the output.
09
Restore the training change
Include the section again
Restore the section after the training example.
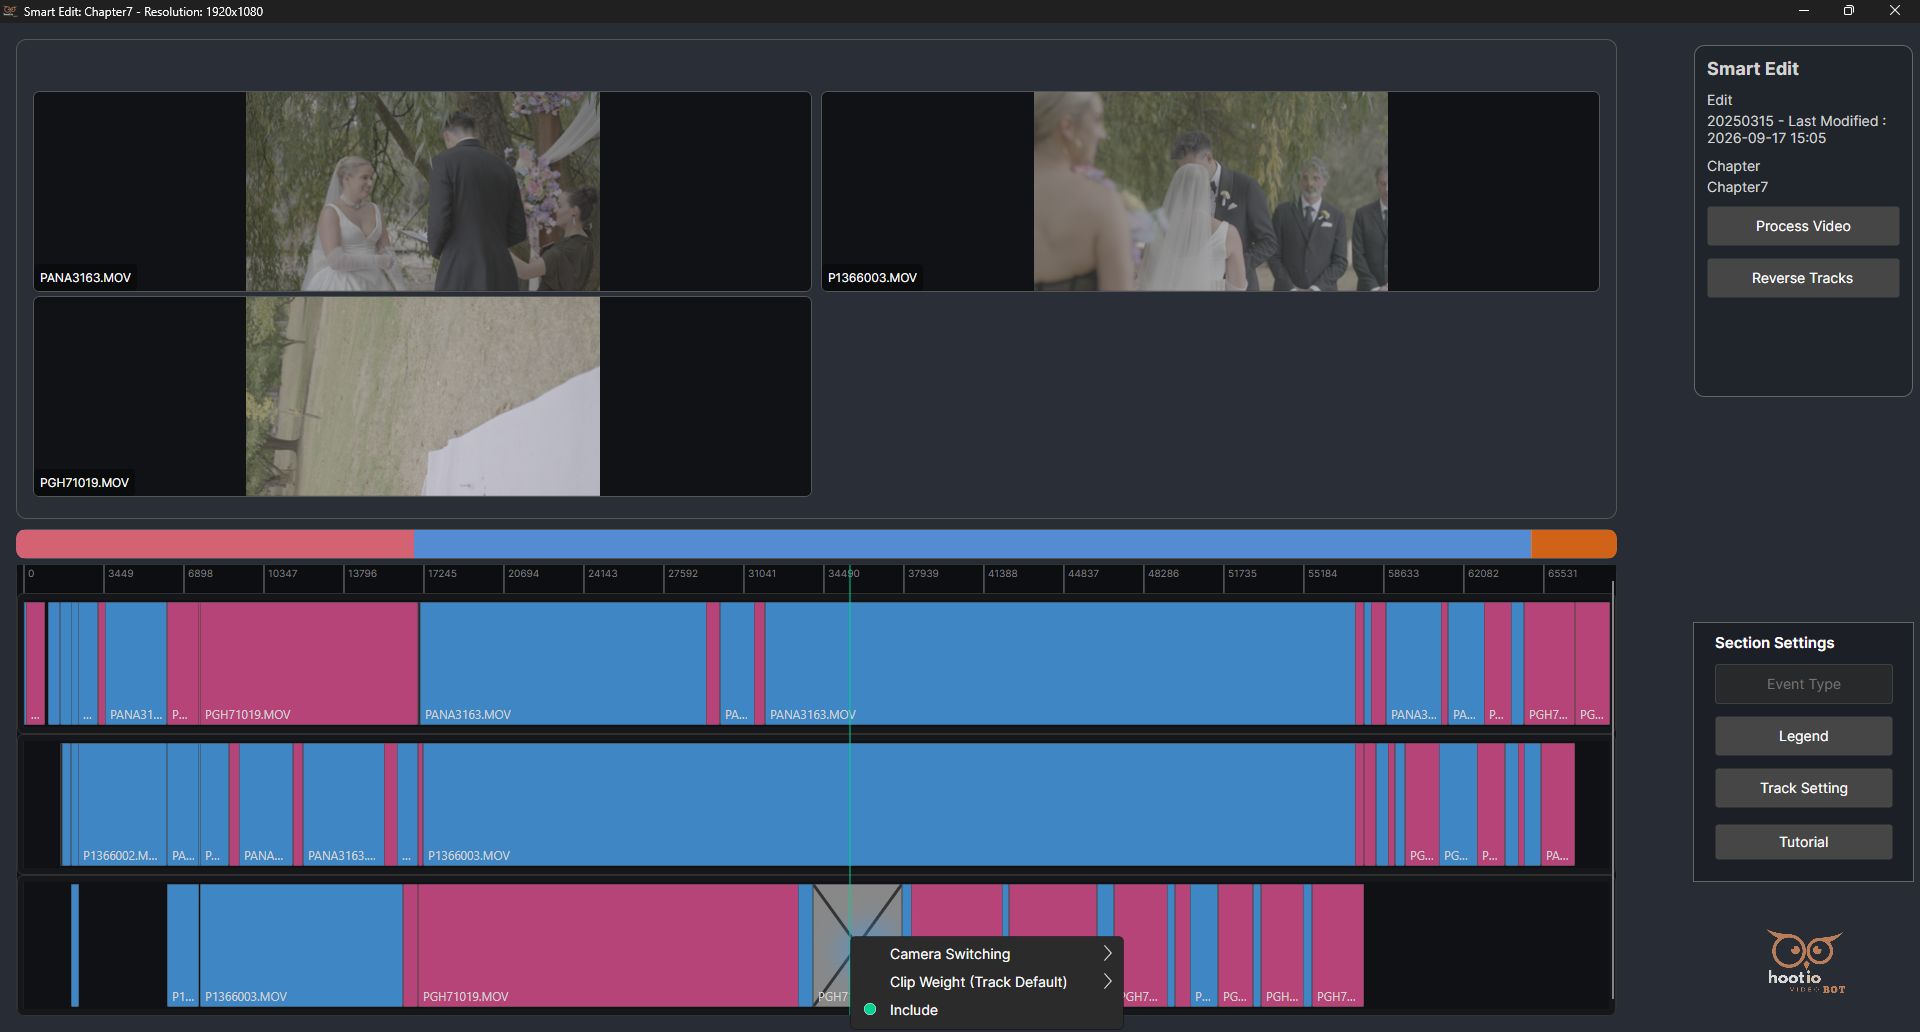
EnlargeThe same context menu now offers Include for the excluded section.
Do this
Right-click the same gray section marked with an X.
Notice that the context menu now offers Include.
Click Include to return the section to participation.
Check the result
The menu label reflects the current state: an excluded section can be included again before processing.
Keep in mind
Choose the same section. Including a different section would not reverse this example.
10
Final arrangement check
Verify that the exclusion has been cleared
Confirm the final input arrangement contains no remaining exclusion from this exercise.
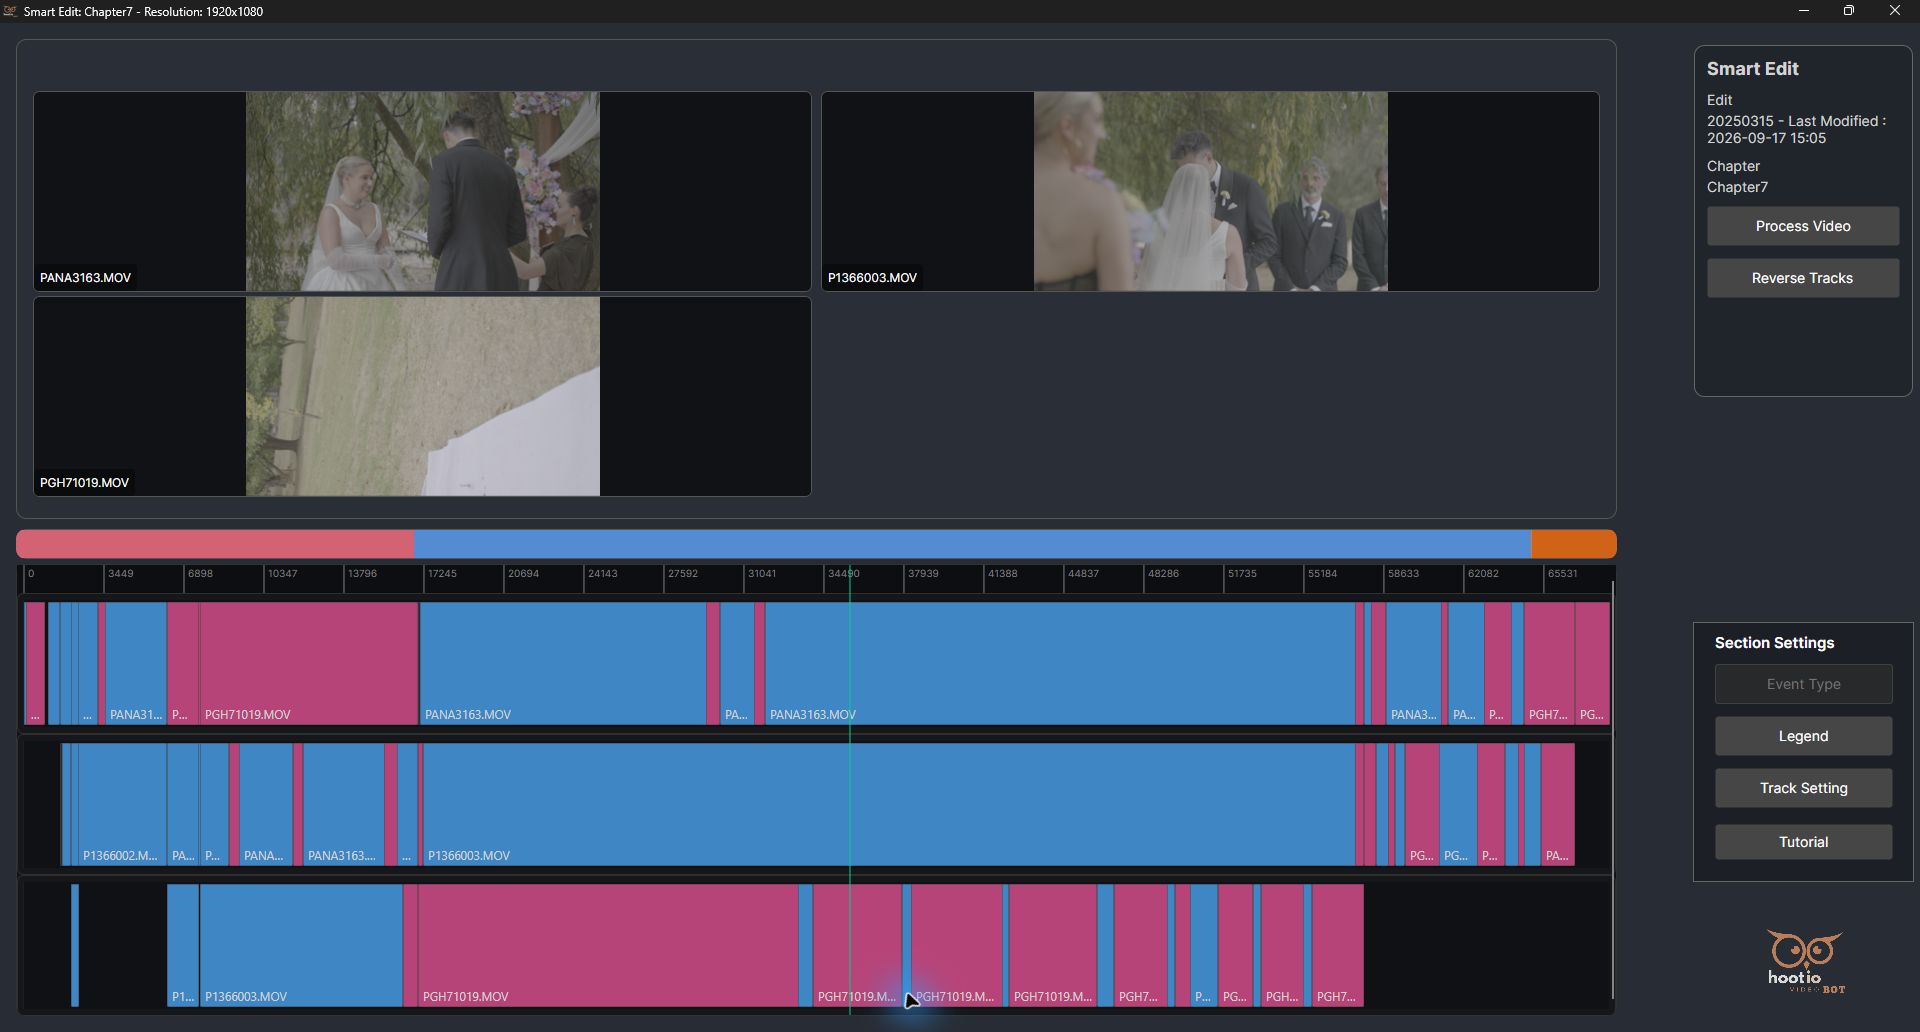
EnlargeThe third-row section is included again; the optional exclusion will not be submitted.
Do this
Check that the gray fill and X have disappeared from the third-row section.
Confirm the section again uses its normal timeline appearance.
Keep the original three-track priority and continue to the settings review.
Check the result
The temporary Reverse Tracks and Exclude exercises have both been restored.
No Hold setting, clip-weight override, or split was added during these exercises.
Keep in mind
This restoration was completed before Process Video. Do not assume the same in-editor recovery remains available after an excluded segment has been submitted.
11
Observed in the application
Inspect the three track-weight settings
Understand normal duration and rotation preferences without changing the demonstrated arrangement.
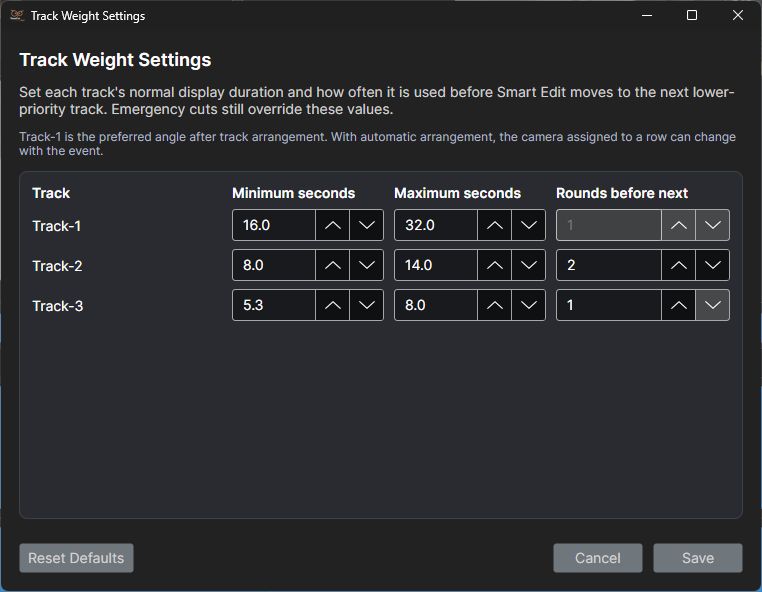
Click Track Setting in the Section Settings panel.
Read Minimum seconds, Maximum seconds, and Rounds before next for all three rows.
Leave the values unchanged and click Cancel, as in this session.
Check the result
Track-1 is the preferred angle. Its rounds field is disabled at 1.
Track-2 normally uses shorter shots and 2 rounds before moving to the next lower-priority track. Track-3 has the shortest observed range.
These preferences guide normal shot duration and rotation. They do not set audio volume or opacity.
Cancel retained the original values. No weight changes were saved.
Keep in mind
The dialog explicitly warns that emergency cuts can override these values. Normal duration ranges are not absolute guarantees.
12
Observed in the application
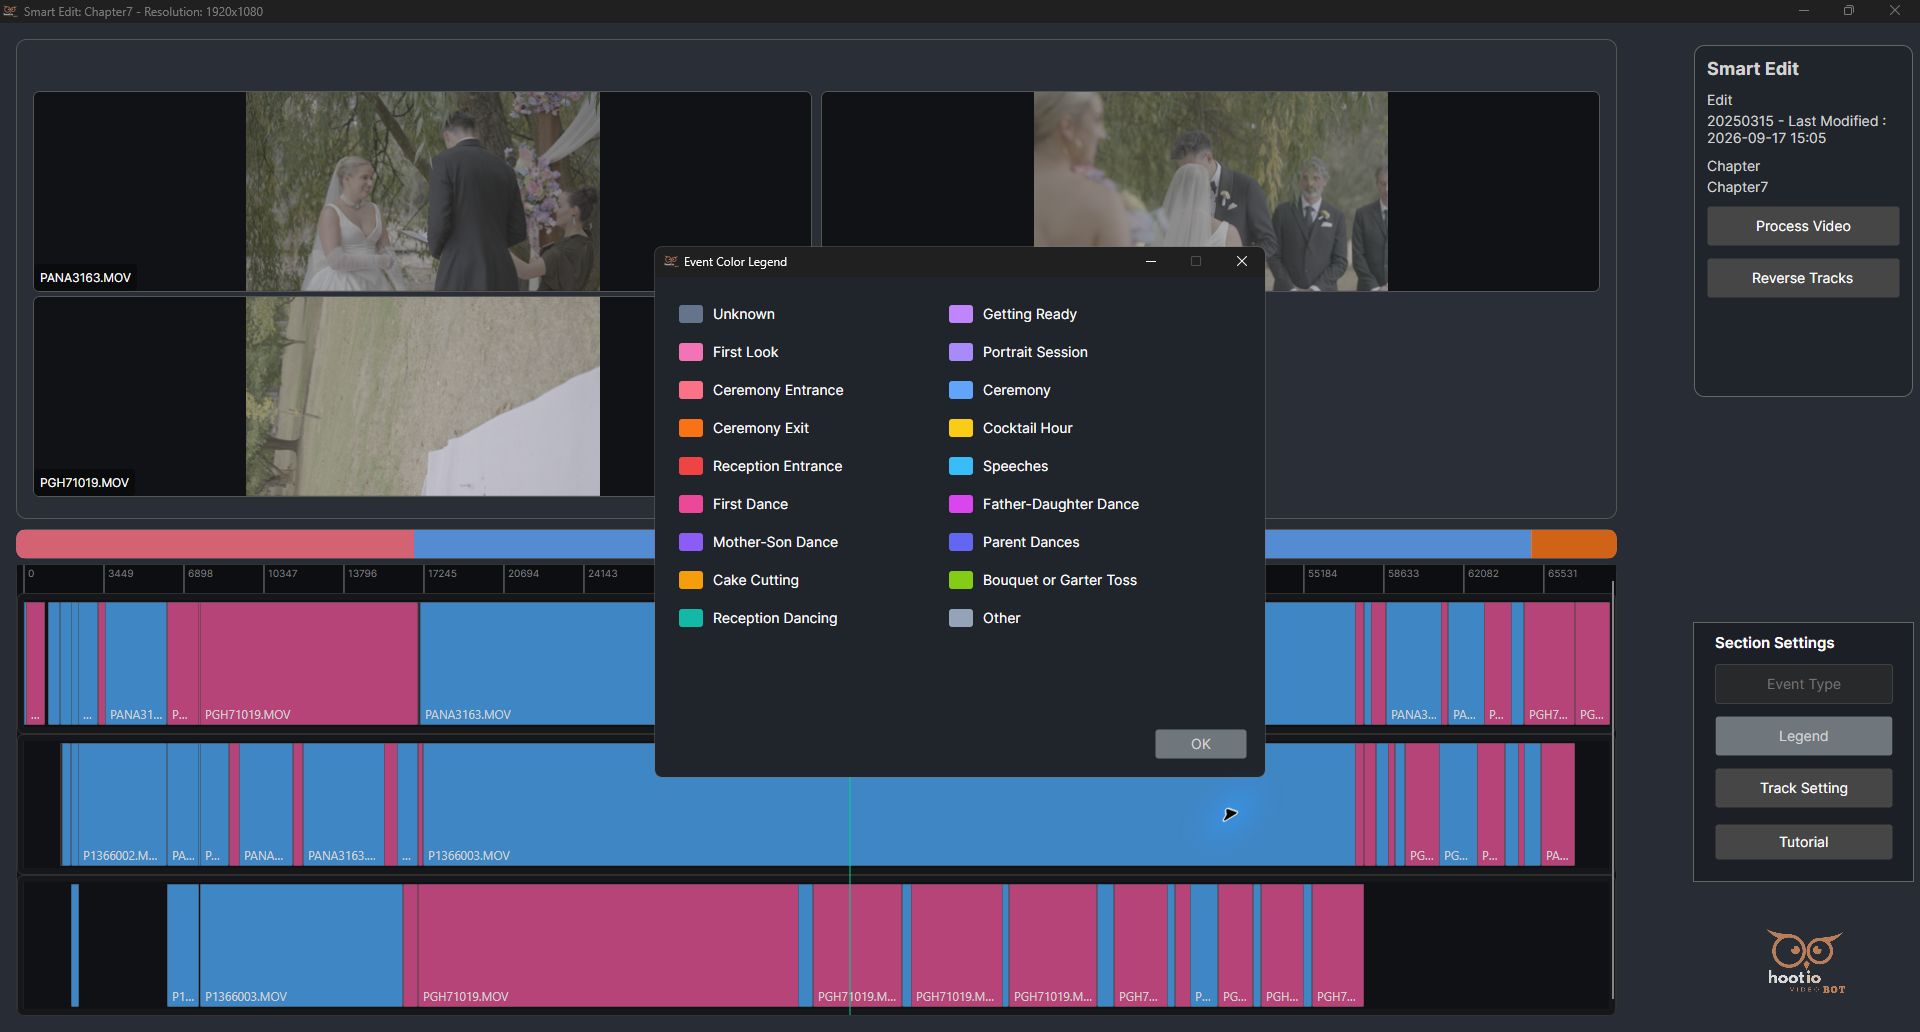
Read the event-color legend
Understand how the existing ceremony event sections are represented.
EnlargeThe Event Color Legend explains the existing entrance, ceremony, and exit colors in the chapter strip.
Do this
Click Legend in the Section Settings panel.
Match Ceremony Entrance to pink, Ceremony to blue, and Ceremony Exit to orange.
Compare those colors with the event strip behind the dialog, then close the legend with OK.
Check the result
The event strip already marks an entrance section, a long central ceremony section, and an exit section.
The legend explains other supported events as well, including speeches, dances, and reception segments.
No event type was changed in this demonstration.
Keep in mind
Use the event strip to orient the review, and confirm its meaning against the pictures. The legend does not itself edit the chapter.
13
Observed in the application
Review the ceremony entrance
Check how camera roles change in an earlier event section.
EnlargeIn the entrance section, PGH71019.MOV is the top view and provides useful coverage of standing guests.
Do this
Click a position in the pink Ceremony Entrance region of the ruler.
Wait for the three available previews to refresh.
Compare the guests’ view, the groom’s position, and the alternate close view before moving on.
Check the result
The top-left preview is PGH71019.MOV; the top-right is PANA3163.MOV; the lower-left is P1366003.MOV.
PGH71019.MOV is useful here even though it pointed at the ground at the sampled ceremony moment.
The change in row contents across event sections shows why a track priority is not a permanent camera assignment.
Keep in mind
Do not exclude an entire camera file because one later segment is poor. Review the intended range.
14
Observed in the application
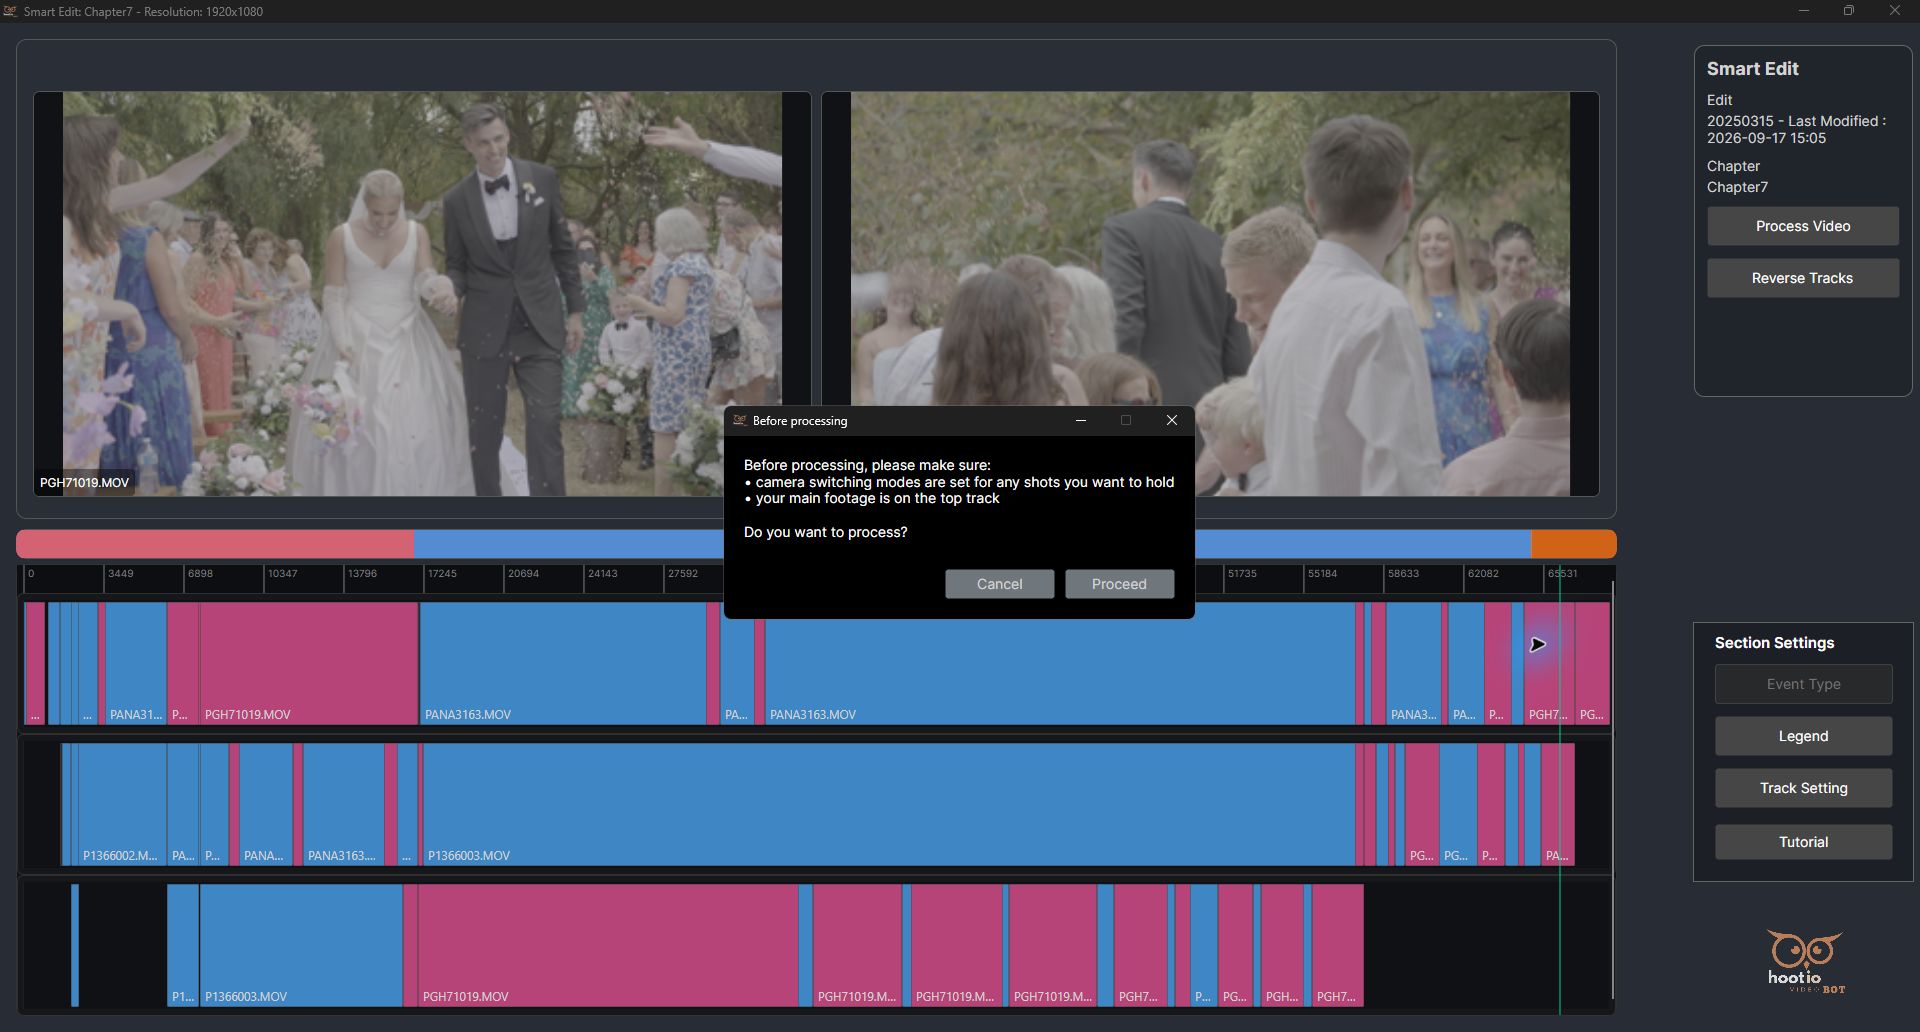
Review the ceremony exit
Check the end of the chapter and confirm the useful outgoing-couple coverage.
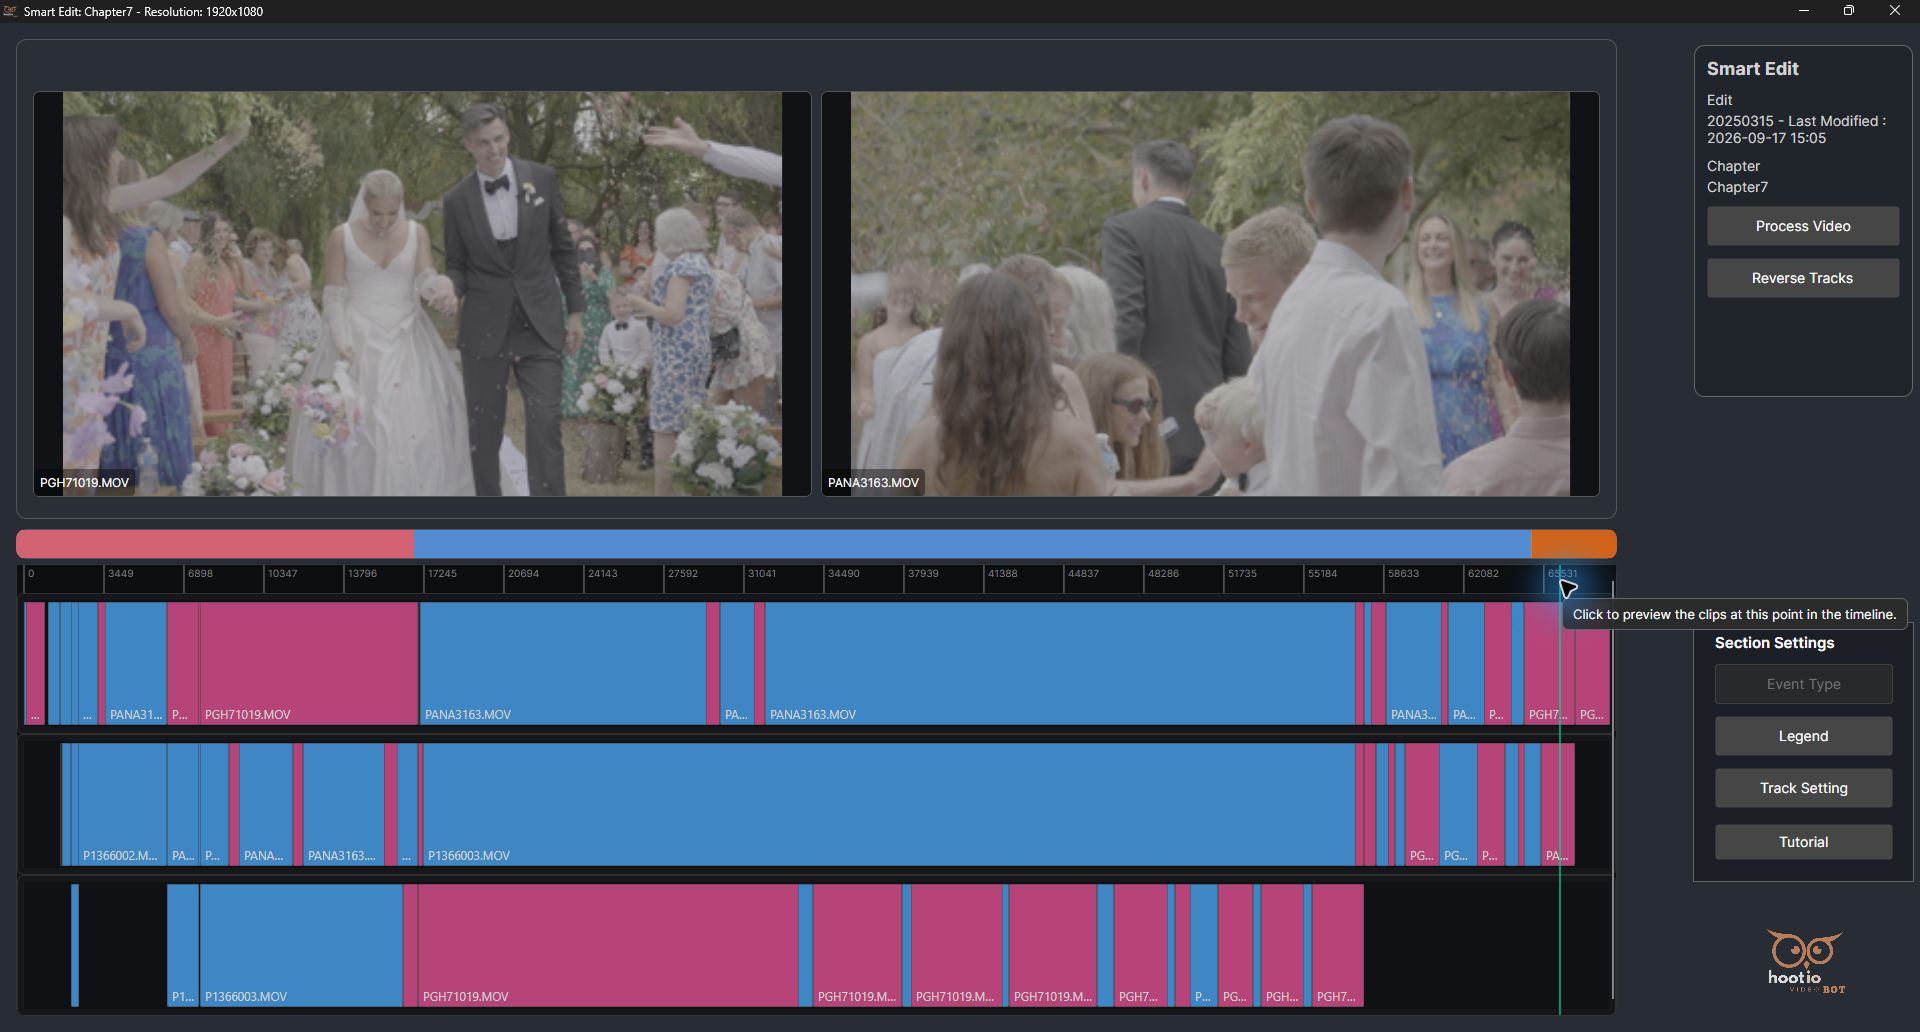
EnlargePGH71019.MOV now provides the main view of the couple leaving along the aisle; PANA3163.MOV shows the reverse view.
Do this
Click a position in the orange Ceremony Exit region near the end of the ruler.
Compare the two previews available at that position.
Confirm that the preferred view shows the couple walking toward the camera and that the supporting view supplies the reverse perspective.
Check the result
The left preview / top row is PGH71019.MOV, showing the couple walking toward the camera.
The right preview / second row is PANA3163.MOV, showing their backs through the guests.
Only two previews are available here although the chapter contains three tracks. The third row has no clip at this point.
The entrance, central ceremony, and exit have now all been sampled. The original event-based camera priorities are retained.
Keep in mind
Sampling these positions does not establish that every frame and every audio transition is ready for delivery. A full edit review remains necessary.
15
Observed in the application
Confirm the final arrangement and process
Generate the automatic ceremony edit with the intended, restored configuration.
EnlargeThe real confirmation appears over the reviewed ceremony exit. Proceed submits the chapter for automatic editing.
Do this
Click Process Video.
Read the Before processing reminder: camera switching modes should be set for shots you want to hold, and main footage should be on the top track.
Confirm that the original priorities are restored, the training exclusion has been included again, and the original track weights remain unchanged.
Click Proceed and wait for the automatic chapter request to finish. Use Cancel instead if any arrangement still needs correction.
Check the result
The session finished with the original event-based track priorities.
No Hold setting, exclusion, clip split, event edit, or weight change was retained from the demonstration.
A long ceremony clip was not held merely to demonstrate a button. Hold remains an optional, range-sensitive instruction in the reference below.
Keep in mind
Proceed is a processing action. Verify the saved files separately before reporting an exported result.
16
Observed in the application
Save the ceremony timeline files
Choose a dedicated destination for this Chapter7 export.
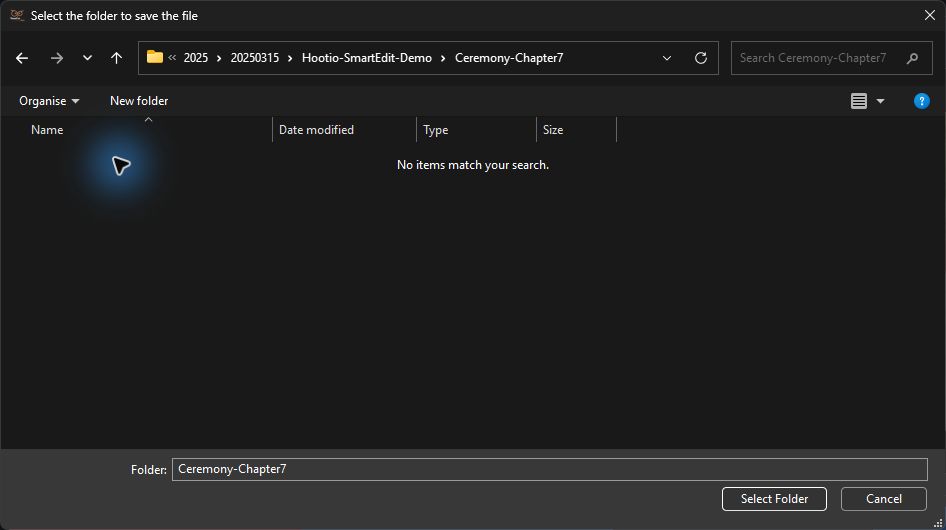
EnlargeThe Chapter7 result is saved in the dedicated Ceremony-Chapter7 folder.
Do this
When Select the folder to save the file opens after processing, navigate to Hootio-SmartEdit-Demo and its Ceremony-Chapter7 subfolder.
Check that the Folder field reads Ceremony-Chapter7.
Click Select Folder, then inspect the files actually written to that directory.
Check the result
The application saved five nonempty files with the timestamp 2026-09-25_02-05-41.
The output consists of two XML timelines, a matching color manifest, a Lua helper, and Resolve instructions.
The file-level verification and any export issues are recorded below; no destination-editor import was performed.
Keep in mind
XML is an editable timeline description, not a rendered movie or a package containing the source media. Keep its referenced media available.
03 / BEFORE & AFTER
Why the main-track priority matters
Temporary reversal; training example
EnlargeReversing all tracks puts the ground-facing view first at this moment.
Restored order; retained for processing
EnlargeA second reversal restores the useful bride-facing main view, with the groom-facing reverse angle second.
Both images show the same ceremony position. The reversal is an optional exercise and was restored before processing. The temporary exclusion was also included again; no training-only change was left active.
04 / UNDERSTAND THE CONTROLS
Priority, duration, and coverage
The top row is the preferred main angle for a range; it is not a promise to use one physical camera for the whole chapter. Hold and track weights guide the automatic edit.
Track weights observed in this sessionSwipe the table to see all settings.
Track
Role
Minimum
Maximum
Rounds before next
Action
Track-1
Preferred main track
16.0 s
32.0 s
1 (disabled)
Viewed; unchanged
Track-2
Supporting track
8.0 s
14.0 s
2
Viewed; unchanged
Track-3
Additional alternative
5.3 s
8.0 s
1
Viewed; unchanged
The dialog was closed with Cancel. No new values were saved. Emergency cuts can override normal durations and switching preferences.
Workspace control reference
Control
What it does
Preview area
Shows the source images available at the selected ruler position. Read the filename on each preview to identify its camera.
Frame ruler
Click to choose a timeline position and refresh the available previews. Labels are frame values.
Top track
The preferred main angle for the current range. In the sampled ceremony moment it is PANA3163.MOV.
Second track
The supporting angle. In the sampled moment it is P1366003.MOV, a useful view from the opposite side.
Third track
An additional alternative. At the sampled moment PGH71019.MOV points at the ground; check other moments before changing its participation.
Event strip / Event Type / Legend
Show or edit event sections and explain their colors. Chapter7 already has entrance, ceremony, and exit sections.
Track Setting
Opens normal shot-duration and rotation settings. The three rows were inspected and retained with Cancel.
Reverse Tracks
Reverses the complete track order. It does not swap only one local clip range.
Process Video
Opens the confirmation before generating the automatic chapter edit after Proceed.
Tutorial
An in-app guidance entry visible in the editor.
Optional selection and per-clip adjustments
These additional operations are separate from the observed basic workflow.
Select clips deliberately
Reference behavior: click a clip to toggle its selection, click others to build a selection, or drag a rectangle from an empty area without Shift. Check the highlighted ranges before applying All selected clips.
Exchange one local range
Reference behavior: dragging a clip vertically exchanges the affected time range between rows and preserves synchronized timing. A horizontal drag within the same track is not a free time shift. This is different from reversing the complete track order.
Reorder an entire track
Reference behavior: Shift-drag an empty track area vertically to exchange whole tracks. Reverse Tracks reverses the complete order. Check the preview order after either operation.
Use Hold only where it serves the edit
Camera Switching → Hold This Camera can target This clip or All selected clips. A long ceremony recording can cover many minutes, so inspect its range before applying Hold. The control is a switching preference, not an unconditional lock; emergency cuts can still occur.
Override a single clip’s duration settings
Reference behavior: Clip Weight → Set / Edit Override... opens a per-clip weight. Use Track Weight returns to the row’s values. These controls change normal duration and rotation preferences; they do not set audio level.
Understand exclusion before processing
Reference behavior: Exclude changes participation in the automatic edit and does not delete source media. Excluded segments are removed from the processing model when submitted. Restore an exploratory exclusion with Include before processing if the footage should remain available.
Keyboard reference · checked in source, not demonstrated
These shortcuts were checked in the source and were not exercised in this screenshot session. Click the ruler to give the editor focus first. Arrow-key previews refresh after release. No Ctrl+Z, Ctrl+S, Space playback, or persistent chapter-draft behavior is claimed.
Key
Behavior
1–9
Select an available navigation track. This does not immediately choose that camera as the final output angle.
Left / Right
Move by one thumbnail sampling interval after selecting a ruler position. This is not single-frame stepping.
Shift + Left / Right
Move by five thumbnail sampling intervals.
Up / Down
Move to the previous or next clip boundary on the selected navigation track.
C
Split clips spanning the selected position across all video tracks, not only a selected clip. Use only when an intentional split is required.
05 / CHECK THE OUTPUT
Inspect the files, then review the edit
Five files generated; Premiere XML encoding issue identified
The result of this session
Chapter7 was processed and five original files were saved to Ceremony-Chapter7 at 2026-09-25 02:05:41. Structural checks confirmed a 1920 × 1080, 25 fps timeline of 68,338 frames (45 minutes 33.52 seconds). The original Resolve XML parses correctly. The original Premiere XML has a UTF-16 declaration despite UTF-8 bytes; a separately named UTF-8 copy was saved alongside the originals in Ceremony-Chapter7 and passes strict parsing. The originals were preserved. No editing-application import, full-duration playback approval, or final video render was performed.
Generated file
Purpose and check
PrePro-Chapter7-2026-09-25_02-05-41.xml
Premiere-oriented timeline XML; 725,610 bytes. Original encoding declaration mismatch identified; use the separate UTF-8 copy if needed.
Timeline identity and format: Chapter7, 1920 × 1080, 25 fps, 68,338 frames, equivalent to 45 minutes 33.52 seconds.
Resolve XML: the original file parses as FCPXML 1.7 with 535 asset-clip placements and 6 source assets.
Premiere XML: strict parsing of the original fails because its declaration says UTF-16 while the bytes are UTF-8. Correcting only that declaration produces valid XMEML 4 containing 535 video placements and 12 audio placements, represented across 7 video and 6 audio tracks.
Media references: both timeline variants resolve to the same 6 local physical media files, and all 6 exist. Different URI spellings were deduplicated before counting; the XML files do not embed these media.
Color support: the JSON manifest parses, contains 535 clip entries, and names the generated Resolve XML. The accompanying Lua helper and instruction file are present.
Correction: PrePro-Chapter7-2026-09-25_02-05-41-UTF8.xml is a separate corrected copy in the same Ceremony-Chapter7 output folder. A byte-level check confirmed that only the encoding declaration changed; strict parsing succeeds. The original export was not overwritten.
Continue in your editing application
For a Premiere import, select PrePro-Chapter7-2026-09-25_02-05-41-UTF8.xml from the same Ceremony-Chapter7 output folder. This separate copy corrects the encoding declaration; the original file is retained.
For Resolve, use the generated DavResFCPX XML and follow its matching instruction file if applying clip colors.
After importing, check the sequence frame rate and duration, relink media if necessary, and review the camera cuts and audio synchronization.
Finish the edit, color, and sound in the destination application, then render the delivery video. File parsing alone does not validate that final workflow.
06 / BEFORE DELIVERY
Keep the final review in view
Configuration retained
Original event-based track priorities; all demonstrated sections included; original track weights. No Hold setting, split, event edit, or clip-weight override was added.
Files checked
Five nonempty originals; valid Resolve XML and color JSON; all 6 referenced media files present. A declaration-only UTF-8 correction of the Premiere XML was separately saved and strictly parsed.
Review in your editor
NLE import and full playback were not performed. Inspect the imported sequence, camera cuts, media links, and audio before rendering the final video.
Practical limits and final review notes
The demonstration uses the old completed 20250315 project record identified by 2026-09-17 15:05.
The main ceremony is verified visually in Chapter7. Its chapter-list range and clip count describe this specific saved project.
The screenshot sequence records selected editing actions and application states. It does not replace a full-duration picture and sound review.
A poor view at one moment does not establish that the entire original camera recording is unusable.
Hold and track weights guide normal camera selection; emergency cuts can override them.
An exported XML timeline refers to media and is not a rendered video. Destination-editor import and playback must be checked separately.
No undo shortcut or persistent editable chapter draft was verified. Use intended, reviewed ranges for splits, exclusions, and switching overrides.
The Premiere-oriented original has an encoding declaration mismatch. Use the separately supplied correction where necessary; no XML or source-media download is published with this guide.
 Enlarge